Author Archives: jay

How do I host a domain name?

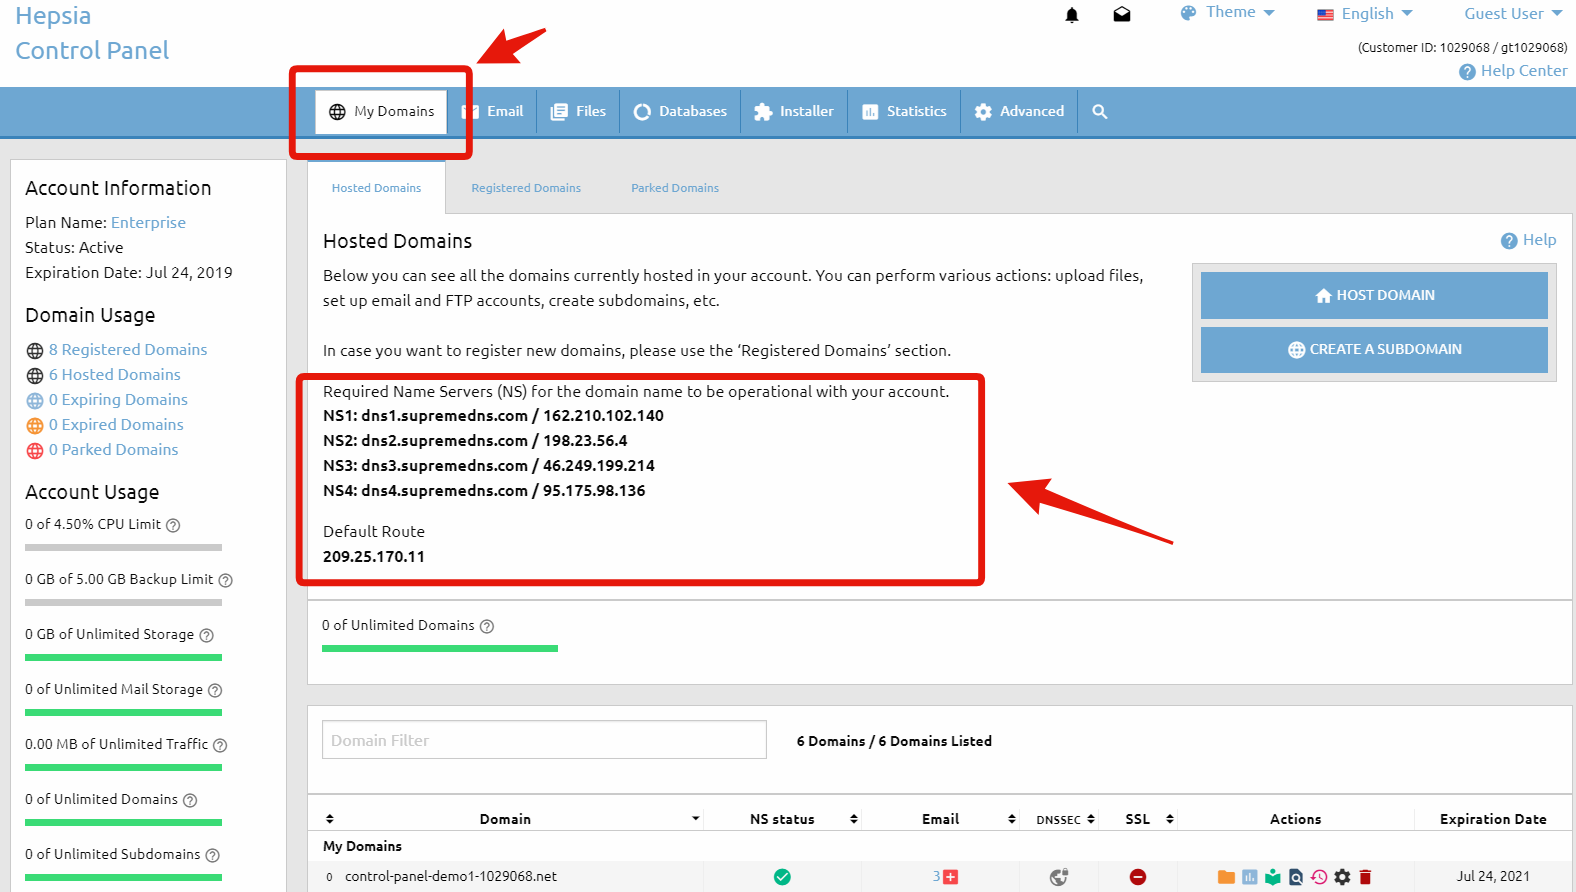
You can host multiple* domain names in a single hosting account with us. The first domain name that will be hosted in your account is specified during the signup procedure. In order to properly host additional domain names, go to My Domains > Hosted Domains section, click the “Host Domain” button and follow the steps:

1. Make sure the option “Host Domain” is selected.
2. Type in your domain name, e.g. my-best-domain.com

*The domain name must be registered and the name servers must be changed with the ones specified in the Hosted Domains section.

Note: the “Don’t manage DNS” option has to be selected ONLY if you wish to use third party name servers for your domain name and just point it to this account using A record redirection. Otherwise leave that box unchecked and set our Name Servers (NS) for your domain.

Each domain name servers are managed from its Registrar – the company, where you have bought the domain from. If your domain name has been registered from this hosting account, its name servers could be managed from My Domains > Registered Domains.

3. Advanced Settings – this section is optional. Please leave the default settings if you are not sure what to do.

4. Click „Add a Host“ to host your domain in your hosting account.

Once you add the domain name, a red icon will be displayed under the NS column. Once the name server changes propagate (this may require up to 24 hours), the DNS status will be updated as well. More information on that matter is available in the article: Why is there a red icon sign (DNS error) for my domain’s name servers?

* Please have in mind that in order to host additional domain names, you must make sure that your hosting plan can support it. For that you should refer to the Account Usage table available on the left side of the Web Hosting Control Panel.

There you can see the number of domain names that you are currently hosting and the number of the domain names that you can add. If the available amount is zero, you must upgrade your account in order to host more domain names. You can find more information in the article How do I upgrade my hosting account?

How to create a subdomain?

Subdomains are basically separate hostnames that are part of a larger domain.

 For instance, “example1.my-best-domain.com” and “example2.my-best-domain.com” are subdomains to the larger domain “my-best-domain.com“.

You can have a further subdivision – “english.example1.my-best-domain.com” and “spanish.example1.my-best-domain.com” are subdomains to “example1.my-best-domain.com“.

In theory, this subdivision can go down to 127 levels deep, and each one can contain up to 63 characters, as long as the whole domain name does not exceed a total length of 255 characters. In practice, some domain registries have shorter length limits than that.

Subdomains are commonly used to assign a unique name to a particular department, function, or service related to the main site or organization. For example, the forum on a given website can have its separate subdomain – forum.my-best-domain.com.

From the Hosted Domains area of the Control Panel, you can create a subdomain for a domain name that is already hosted in your account. 

Here are the steps to follow:

  1. Click on the “Create a Subdomain” button on the top right and make sure the option “Create a Subdomain” is selected.
  2. To create the subdomain webmail.my-best-domain.com, type in “webmail” and select “my-best-domain.com” from the the drop-down menu, containing all hosted domains.
  3. Advanced Settings – this section is optional. Please leave the default settings if you are not sure what to do. (Read further below to learn more about the Advanced settings)
  4. Click “Add a Host” to create the subdomain. The new host will need about 10 minutes to start working.

Here is what the Advanced settings are about:

Path: this field enables you to choose the folder that the subdomain will point to. By default that is: /www/subdomain/. For instance, the default path to example1.my-best-domain.com is /www/example1.my-best-domain.com/. 

IP Address: here you have a dropdown menu that enables you to select the shared IP address of your account or assign a dedicated IP address for that particular subdomain. For more information on dedicated IP addresses, please refer to the respective articles in this knowledge base.

After that you have the option to specify a custom error page for errors 400/401/403/404. You can also use the system (Apache) page or the default error pages.

Secure Socket Layer (SSL): this option enables you to use secure pages on this subdomain. For more information on SSL, please refer to the respective articles in this knowledge base.

ModSecurity: the ModSecurity firewall option allows you to protect your subdomain-installed applications from most common hacker attacks; 

Further below you have the option to Activate Access & Error Logs. The Access Logs show you when the subdomain was accessed and by what IP address. The Error Logs show when and what errors occured on the subdomain.

You can see all subdomains in your account listed in the table of hosted domains.

In this table, you can find the following information per subdomain: the current name server status, the number of pertaining mailboxes, an indicator if an SSL certificate is installed, an indicator if DNSSEC is enabled, a button that will open the folder that this subdomain is pointed to, a button to check the traffic stats for this subdomain, a button to edit this subdomain and finally a button to delete this subdomain.

IMPORTANT: The “www” subdomain is the default subdomain of your domain. You cannot delete the “www” subdomain. Instead, you can simply delete the domain name from the Hosted Domains section of the Control Panel. Editing the “www” subdomain also updates the domain name itself. In other words, if you want to edit the domain name my-best-domain.com, then simply edit the www.my-best-domain.com subdomain.

What are the correct name servers (DNS) for my domain?

If you wish to host a certain domain name in your account with us, our name servers must be assigned for it so that it works properly. You can easily find the correct name servers that you need in the Hosted Domains section (My Domains > Hosted Domains) of the Web Hosting Control Panel. They are displayed on the left side, above the table that lists all the domain names that have been added to the Hosted Domains section.


correct name servers

If the domain name that you want to host with us is also registered with us or has been successfully transfered to us, you can change the name servers for the domain name via the Domain Manager section (My Domains > Registered Domains) of the Web Hosting Control Panel. For detailed instructions how to do that, please see the article: How to change the Name Servers of a domain name?.

If your domain is registered with another company, you must change the name servers at their end. There should be a Control Panel to manage the domain name and the name servers listed in the Hosted Domains menu must be applied to your domain. If you cannot find such a menu or you experience any problems changing the name servers, you should contact the customer support staff of the company that has registered the domain name for you.

IMPORTANT: Apart from changing the current name servers with ours, in order to host a domain name in your account it must be added to your Hosted Domains. For detailed information about hosting a domain, please refer to the article: How do I host a domain name?.

What is an FTP account and (why) do I need different FTP accounts?

File Transfer Protocol (FTP) is a standard network protocol used to exchange and manipulate files over a TCP/IP based network, such as the Internet.

In other words, FTP offers a convenient and fast way for uploading or downloading files to and from the server.

In order to establish an FTP connection you need to have an FTP account on the server.

For more information you can read the article How to connect via FTP and upload/download files?

The FTP account is basically a set of a username and a password that authorizes access to the server via FTP.

The default FTP account that is created when your hosting account is set up provides access to the main /www/ folder of your web hosting account.

You also have the option to create new FTP accounts and you can do that via the FTP Manager section of your Control Panel (Files > FTP Accounts).

What is more important is that for each FTP account you can set an access path.

This way the newly created account provides access to a certain folder and its sub-folders, while all other folders are inaccessible.

That is useful if you wish to provide access to a third party (for example a web designer) to upload to your account without providing full access to that web hosting account.

What is a MySQL database?

MySQL is one of the most popular and widely used Relational Database Management Systems (RDBMS).

Many web applications such as forums, content management systems, etc. use a database to store data (content). The majority of web applications that use databases require a MySQL database to operate.

For example, the popular web applications Joomla, Drupal, osCommerce and WordPress store their data in MySQL databases.

It is almost guaranteed that if your web application (especially those written in PHP) requires the use of a database, then it will need exactly a MySQL database or will at least support MySQL.

To be sure, however, check the technical requirements of the web application. The data in a MySQL database is structured in tables which consist of columns and rows.

Whenever your script (application) needs to access specific data, it “asks” (makes query) the MySQL database for the content of a specific field (the intersection of a column and a row in a table).

To create a MySQL database in your hosting account, go to the Databases > MySQL Databases section and click on the Add MySQL tab, on the right side of your Control Panel. 


Add MySQL Database

Usually a separate database is created for each web application that you install. Thus, the web applications can be managed easier.

In the MySQL Databases section you can also see a list of all MySQL databases that you have.

Note that the database name and the username are the same. For example, if you have a database whose name is account_database, then the username for the database will be account_database and vice-versa.

On our servers a database can only have one user (that is created by default) and new users cannot be created. The default user of the database has all the priviliges.

When you set up a script to use one of your databases you need the database name and username (which are the same, as mentioned above), the password and the MySQL host/server. You can find the MySQL host under the table with your existing MySQL databases. It is usually localhost.

How do I reduce the CPU usage of my hosting account?

The CPU usage involves the Central Processing Unit(s) of the web server where your account is hosted on.

Each hosting account has a CPU usage limit, which, when reached, may result in the account being suspended.

You can monitor the CPU usage stats for your hosting account at any given moment from the Statistics -> CPU Stats section of your Control Panel.

You can compare the current CPU usage with the allowed limit for your account, which you can see in the Account Usage table (located on the left side of your Control Panel).

To reduce the CPU usage of your account, there are several general rules you should follow:

  • Upgrade all third-party web applications to the latest stable release available (Joomla, WordPress and any other content management or blog systems, forums, galleries or any other scripts that you have installed)
  • If any of the web applications that you use have addons or plugins, make sure they are upgraded to the latest availble versions as well
  • Remove any unused web applications and/or plugins/addons that you have installed
  • Activate caching for any web applications that you use that have this option
  • If you have developed your script(s) yourself, try reducing the number of MySQL/PostgreSQL queries and optimize your scripts to use less processing time.

If you need to deal with a high CPU usage problem and reduce the CPU usage, you must first identify the reasons for the high CPU usage.

Unfortunately, this is often quite difficult, especially if you are using third-party web applications such as forums, content management or blog systems, etc. that you have not developed yourself and have little or no knowledge at all about their inner working.

Here are a few recommendations you could consider to get an idea where to start from:

  1. Identify the website that is most likely to be responsible for the high CPU usage.
    If you host more than one website (domain/subdomain) in your account, start by identifying which one is most visited and which one generates most traffic – this is probably the one that’s responsible for the high CPU usage. Go to the Statistics > Traffic Stats section and find out which of your hosts (domains or subdomains) has generated the most traffic for the past day and for the current month.
  2. Identify the file that is most likely responsible for the high CPU usage (if any).
    Once you have established which website has generated the most traffic by visiting the Statistics menu, go to the Statistics > Traffic Stats section of your Control Panel and view the traffic stats for this domain/subdomain for the current month. Look for the file(s) that have generated most traffic – you can find them in the Top 10 of XX Total URLs By KBytes table. Look for any PHP/CGI files in this list that have generated unusually large amounts of traffic. This file(s) is most likely the reason for the high CPU usage and you should consider optimizing it.
  3. Identify the visitor/bot that is most likely responsible for the high CPU usage (if any).
    Like in step 2, look at the monthly traffic stats for your domain/subdomain and look for the visitor/host that has generated most traffic this month. You will find the list under Top 10 of XX Total Sites By KBytes – look for any hosts that have generated unusually large amounts of traffic (compared to the rest) – it would either be an IP address or a hostname of the kind botname.some-domain.com. You may want to block the access of this host(s) or at least restrict it to reduce the CPU usage of your account.

If you are still unable to reduce the CPU usage of your account, you should either look for the help of a professional developer or simply consider a either a dedicated server or at least a VPS or a semi-dedicated server.

What is CPU usage and how do I monitor it?

The Central Processing Unit (CPU), or processor, is the portion of a computer system that carries out the instructions of a computer program.

CPU time is the amount of time a computer program uses while processing CPU instructions.

The CPU time is often measured in seconds, while the CPU usage – by the percentage of a specified overall capacity.

In terms of your web hosting account, CPU usage is the percentage of the capacity of the server’s CPU that your account is generating.

Each web hosting account has a certain CPU usage limit. You can find out the exact CPU limit in the Account Usage table located on the left side of the Control Panel.


Account Usage table - CPU usage

You can monitor the CPU usage of your account via the Statistics > CPU Stats section of the Control Panel.

Once you open that menu, the CPU usage table is displayed. By default, the monthly account usage is displayed.

The columns in the table are as follows:

Day – you can click on each date for detailed information.

CPU Time – the amount of time the CPU has been processing instructions on behalf of your web hosting account.

Execution time – the amount of time applications from your web hosting account have been running.

CPU Usage – the percentage of the capacity of the server’s CPU used up by applications from your web hosting account.

Average Memory – the server memory used up by applications from your web hosting account during the execution time.

Processes – the number of processes that have been running during the reviewed period.

If you click on a particular day, you will see the same set of statistics displayed on an hourly basis.

It is recommended that you review other articles about CPU usage that provide detailed information on how it is calculated, how it affects the account and how to reduce it.

You also have the option to purchase additional CPU usage. For more information, please review the article “How can I upgrade my hosting plan?“.

High CPU usage caused by WordPress

WordPress is a content management system written in PHP. This means that the content it serves is generated dynamically by a set of PHP scripts: every time a visitor arrives at your website, WordPress processes the request and generates a response.

Clearly, responding to a request implies a certain use of server resources: one has to look at the request itself, determine what the visitor wants to access, fetch it from the database, generate the HTML response, and so on.

With this in mind it is not difficult to find out what are the reasons why we can see high CPU usage on the server:

– You get too many requests. If a lot of users come to your website at the same time, or you receive many illegitimate requests (someone’s probably attacking your site), WordPress will have to process all those requests and, therefore, the use of server resources will increase.

– Requests are slow to resolve. If you have a lot of plugins installed or some of your plugins is inefficient for whatever reason, all the requests you get will take longer than needed, because WordPress will run a lot of inefficient code.

Analyzing the problem

First you need to locate the website which is causing the problem, especially if you have more then one WordPress sites installed.

For the purpose, please check the Statistics block on the hosting control panel home page (Dashboard). If you sort the sites by Hits you can easily locate the most visited one.

Then you can find more details about the traffic and if there is any unusual behavior from the Web Statistics section of your control panel. 

Another great tool to locate a high resource consuming website is the MySQL Stats 

After that you have to identify why CPU usage has increased on our website. Has the number of requests to our website increased? Is it now slower to serve individual requests?

Solving the problem

Once of the first things you should try is to get a cache plugin installed. Once of the most popular ones is W3 Total Cache 

This great plugin also allows you to to setup Memcached for your WordPress for additional optimization. Check out our WordPress with Memcached article. 

Another great tool to analyze your WordPress performance is the Query Monitor plugin. 
It enables debugging of database queries, PHP errors, hooks and actions, block editor blocks, enqueued scripts and stylesheets, HTTP API calls, and more.

Sometimes the reason for high CPU usage could be the so called Bad Bots. Bad bots are any bot that hit your website at no benefit to you. These bots consume server resources especially if they hit your website or wp-login page excessively.

One of the great plugins lately is Wordfence and using this plugin you can easily view and block any of those bots and add an extra layer of security to your WordPress along the way.
Wordfence includes an endpoint firewall and malware scanner that were built from the ground up to protect WordPress.

Please check the official WordPress optimization instructions page as well. 

How to create a mailbox?

You can create mailboxes at any of your hosted domains.

To create a mailbox go to Email > Mailboxes in your Control Panel. On the right you see a Create A New Email Account button.

After you click on it, you see several text boxes that you need to be filled in.

Email address – Here you enter the name for your mailbox, which is the part of your email address before the @. Next you choose one of your hosted domains from the drop-down menu on the right. The domain would be the part of your email address after the @.

Password – Here you need to enter the password for your mailbox. You will be using this password to login to the webmail and also when you setup your email account in Outlook and other email clients. You can enter a password using the symbols a-z and 0-9. The password should be between 3 and 32 symbols long. You can use a random password by pressing “Generate password” button.

Forward email – If you select this option, you will be able to enter an email address where all messages received in your new mailbox will be forwarded to. There is also a “Save a copy” option. If you select it, a copy of every message that is forwarded will also be saved in this mailbox. You will be able to setup email forwarding later.

Use Autoresponder – Select Auto-Reply option if you want to enter an auto-reply message, which would be sent back to anyone who sends you an email. Usually this option is used to setup a message informing people that you are on vacation, for example, so it is unlikely that you need this right now. You can setup an auto-responder at any time. (see: How to set an auto-reply message to my e-mail account?)

When you are ready, you can click the Add a Mailbox button to create the mailbox. It will appear in the list of Mailboxes.

You may also find these articles helpful:

Files that could be executed with crontab – allowed file extensions

There are no specific file types that can or cannot be executed from your account.

During our tests, the three most commonly used scripts showed excellent cron job compatibility.

These are PHP, Perl/CGI and bash scripts – with the corresponding extensions – *.php*.pl and *.sh.

Files included in a cron job entry should be Unix executables; in other words – should have execute permissions set.

You can do that using our File Manager (Files > File Manager section of your Control Panel).

Simply click on the desired file and set the permissions to 700 or 755 (the more commonly used format).

When specifying a new Perl cron job from our Crontab menu, we strongly recommend that you include the command perl at the start of the Command to execute field in order to achieve optimal level of support.

If you skip that step, the cron job may not be executed properly and the output may not be sent at all.

Also, when receiving the output of a cron task to your email address, you may get an error stating TERM environment variable not set in addition to the rest of the output.

The easiest way to resolve this error is by starting your bash script files with the following code:

#!/bin/bash
TERM=linux
export TERM